

I'm just gonna come clean about this red velvet cake recipe journey - it cost me around two hundred and thirty dollars in wasted ingredients and nearly broke my spirit as a mom. I'm talking sunken red velvet cake disasters that looked like meteorite craters, frosting that split into chunky nightmares, and that soul-crushing moment when my eight-year-old daughter saw her birthday red velvet cake and tried not to cry. Spent four goddamn years making red velvet cake recipe attempts that were either cardboard-dry, bitter as medicine, or the color of baby poop instead of that gorgeous red everyone expects.


Why This Red Velvet Cake Recipe Finally Saved My Sanity
This classic red velvet cake technique rescued me from being the mom who always brings store-bought desserts to school functions.
What Actually Worked: After ruining this easy red velvet cake recipe probably sixty times, I can swear to you it works because I stopped trying to improvise and started understanding the actual science. The magic isn't in some secret red velvet cake ingredient - it's in respecting the buttermilk chemistry and not massacring the batter with aggressive mixing. My sister-in-law Kelly, who's literally never complimented anything I've cooked in fifteen years of family dinners, asked me to teach her this red velvet cake recipe after tasting it. The technique scales perfectly whether you're making red velvet cake cupcakes for twenty kids or a fancy layered red velvet cake for adults who actually know good dessert.
Why Everything Else Failed Me: Most red velvet cake recipe instructions assume you're psychic about mixing times and ingredient temperatures. They'll tell you to "cream until light and fluffy" without explaining that this takes four actual minutes, not thirty seconds. This homemade red velvet cake approach works because I'm giving you the real timings, the actual visual cues, and the red velvet cake mistakes to avoid. You can prep everything during your kids' screen time, and the red velvet cake mixing process takes exactly eighteen minutes if you don't get distracted.
The moment everything changed: This red velvet cake recipe success clicked when I realized I was treating buttermilk like regular milk and wondering why my cakes tasted flat. Real buttermilk has live cultures that react with the baking soda to create something completely different. Once I stopped substituting ingredients and started buying the right stuff, my failure rate dropped from "every single time" to maybe one disaster per year.
Jump to:
- Why This Red Velvet Cake Recipe Finally Saved My Sanity
- What You Actually Need for Red Velvet Cake Recipe
- How to Make Red Velvet Cake Recipe Without Losing Your Mind
- Top Tip
- Making Substitutions When You're Stuck
- Storage That Actually Works
- What Goes With Red Velvet Cake Recipe
- My Four-Year Battle With Red Velvet Disasters
- FAQ
- More Recipes That Actually Work
- Related
- Pairing
- Red Velvet Cake Recipe
What You Actually Need for Red Velvet Cake Recipe
This best red velvet cake recipe uses ingredients you can find at any regular grocery store. I'm not making you hunt down Madagascar vanilla beans or artisanal cocoa powder.
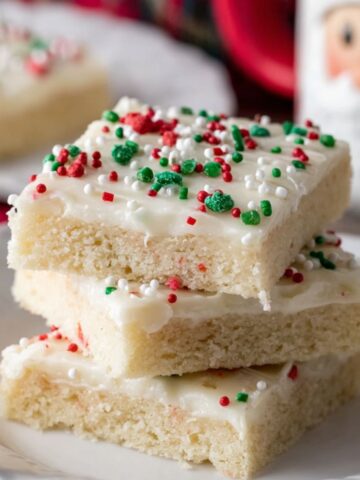
The secret is understanding that red velvet cake lives or dies on three things: real buttermilk that's actually tangy, room temperature ingredients that mix properly, and not freaking out about the food coloring. The cream cheese frosting can make a mediocre red velvet cake amazing or ruin a perfect red velvet cake, so we're doing this right.
Main Foundation
- All-purpose flour
- Granulated sugar
- Unsalted butter
- Large eggs
- Real buttermilk
- Red food coloring
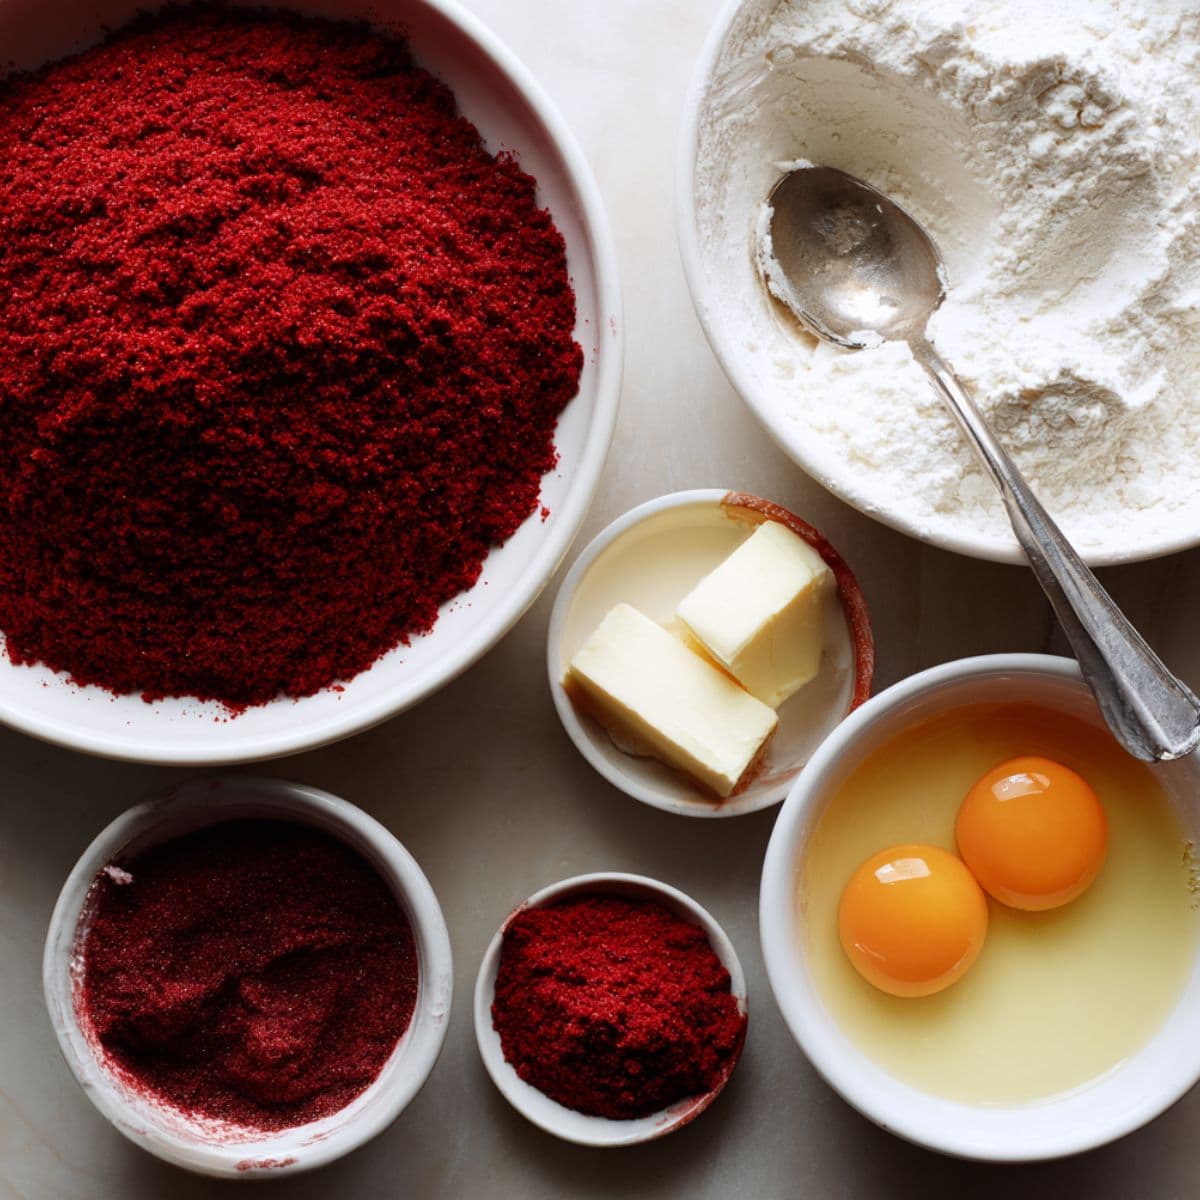
Flavor Chemistry
- Unsweetened cocoa powder
- Pure vanilla extract
- White vinegar
- Baking soda
- Fine salt
Frosting Victory
- Full-fat cream cheese
- Unsalted butter
- Powdered sugar
- Vanilla extract
Recipe card has the exact measurements because I learned the hard way that "about a cup" doesn't work in baking.
How to Make Red Velvet Cake Recipe Without Losing Your Mind
This moist red velvet cake method is about following the actual order and not cutting corners because you're impatient. Every step has a purpose, and skipping stuff will bite you in the ass later.
Get everything ready like a professional
- Pull butter, eggs, and cream cheese out two hours before baking - cold ingredients kill batter texture
- Sift flour and cocoa together or you'll get bitter cocoa lumps that taste awful
- Grease your pans with butter and flour, not just cooking spray that lets cakes stick
- Mix your food coloring with a tablespoon of water so it distributes evenly
- Preheat oven to exactly 350°F and use an oven thermometer because most ovens lie
Build the batter foundation properly
- Cream butter and sugar for four full minutes until it looks like pale whipped cream
- Add eggs one at a time, beating for thirty seconds after each one
- Scrape bowl sides constantly or you'll get streaky batter
- Mix in vanilla and diluted food coloring until completely even
- This step determines whether your red velvet cake will be tender or dense
Master the alternating technique
- Add flour mixture in three additions, buttermilk in two, starting and ending with flour
- Mix on lowest speed just until flour disappears - no longer
- Stir vinegar and baking soda in small bowl until it foams like crazy
- Fold this mixture gently into batter by hand with rubber spatula
- The foaming reaction is what makes red velvet cake different from regular cake
Bake without panicking
- Split batter evenly between pans using kitchen scale if you have one
- Bake exactly 28 minutes for 9-inch pans, 25 minutes for 8-inch
- Test with toothpick that comes out with few moist crumbs, not completely clean
- Cool in pans ten minutes, then turn out onto wire racks
- Do not attempt frosting until completely cool or you'll get a melted mess
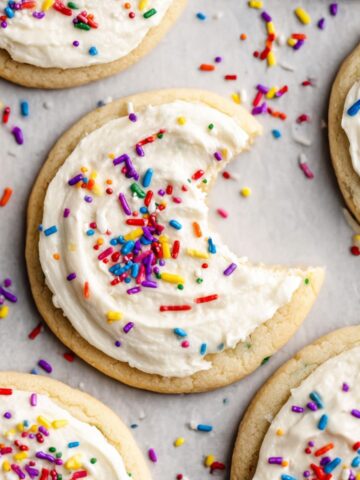
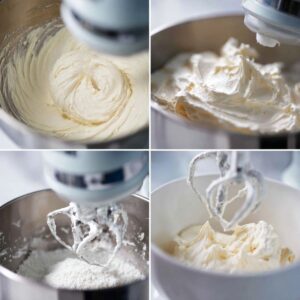
Nail the cream cheese frosting
- Beat cream cheese and butter until absolutely smooth with no lumps
- Add powdered sugar gradually while beating, not all at once
- Beat until frosting holds peaks and looks glossy, not grainy
- This frosting step separates amateur red velvet cake from bakery-quality results

Top Tip
Stop overthinking the mixing and just follow the damn timing. For three years, I'd either undermix and get lumpy batter or overmix and get tough cake. The sweet spot is creaming butter and sugar for exactly four minutes, then mixing flour just until it disappears. That's it. Your red velvet cake recipe will work every time if you stick to these timings instead of going by feel.
Also, buy real buttermilk, not that fake stuff made with milk and lemon juice. Real buttermilk has cultures that create the signature red velvet cake tang and react properly with the baking soda. I wasted probably twenty red velvet cakes before figuring out this wasn't optional.
Making Substitutions When You're Stuck
Life happens and sometimes you're missing ingredients right when you want to bake. No buttermilk for your red velvet cake recipe? Add one tablespoon white vinegar to one cup whole milk, let it sit five minutes. It's not identical but works in emergencies. Out of red food coloring? Your cake will be brown velvet instead of red velvet, but the flavor stays the same.
For different versions of your layered red velvet cake, cupcakes work great with the same batter - just bake eighteen minutes instead. Sheet cake feeds more people if you're doing a party. The core technique stays identical because the chemistry doesn't change based on pan shape.
Storage That Actually Works
This moist red velvet cake stays good for five days in the fridge if you cover it properly with plastic wrap or cake dome. The cream cheese frosting means it can't sit out at room temperature for hours like buttercream cakes. Bring it back to room temperature thirty minutes before serving for best flavor.
You can freeze unfrosted layers for three months wrapped tightly in plastic wrap. The frosted cake freezes okay but the texture gets weird. Better to freeze layers separately and make fresh frosting when you're ready to celebrate.
What Goes With Red Velvet Cake Recipe
This classic red velvet cake is the showstopper dessert for any occasion where you want people to remember your cooking. Birthdays, anniversaries, holidays, or just because you want to feel like you conquered something in the kitchen today.
All you need for serving is a sharp knife that cuts clean slices and maybe some cold milk or hot coffee. The cake is rich enough that it doesn't need ice cream or fancy accompaniments. Sometimes I sneak pieces for breakfast with my coffee, which my kids think is scandalous but whatever - I made this masterpiece from scratch.
My Four-Year Battle With Red Velvet Disasters
Four years ago, I was catastrophically bad at making red velvet cake recipe attempts - the kind that made my kids ask why we couldn't just buy red velvet cakes.
The worst red velvet cake disaster happened on Emma's eighth birthday. She'd been obsessing over this red velvet cake from Food Network. I figured any red velvet cake recipe would be easy.
Everything went wrong with my red velvet cake. Too much cocoa, curdled buttermilk. The finished red velvet cake was concrete-dense and bitter. Emma saw this mess and asked for a "backup cake." We spent her birthday at Walmart buying sheet cake.
That night, I decided to master this red velvet cake recipe or quit baking. I spent weeks reading every red velvet cake article, taking notes like graduate-level red velvet cake chemistry.
Turns out red velvet cake recipes require different techniques than chocolate cake. Red velvet cake has completely different chemistry.
I practiced this red velvet cake recipe obsessively, documenting red velvet cake failures. My family got sick of eating practice red velvet cakes, but I was determined.
The breakthrough: red velvet cake baking is science. Once I followed actual red velvet cake techniques, everything clicked.
Now I make this red velvet cake recipe for every celebration. Emma always requests my red velvet cake. Last month, she told friends I make "the best red velvet cake in the world."
FAQ
What is the flavor of red velvet cake?
Red velvet cake tastes like a subtle chocolate cake with a distinctive tangy, slightly acidic flavor from the buttermilk and vinegar reaction. It's not intensely chocolatey like regular chocolate cake - the cocoa powder is there mainly for color and mild flavor depth. The real signature is that buttermilk tang that makes your mouth water slightly. The cream cheese frosting balances out the acidity with rich, creamy sweetness. After making this red velvet cake recipe probably eighty times, I can tell you it's all about that perfect balance between sweet, tangy, and barely chocolatey that makes people keep coming back for more.
Is red velvet cake basically just chocolate cake?
Hell no, and this misconception ruined my cakes for years. Red velvet uses way less cocoa powder than chocolate cake and gets its character from the chemical reaction between buttermilk, vinegar, and baking soda. This creates a completely different texture - tender and fine-crumbed instead of dense and fudgy. The flavor is also totally different - tangy and subtle instead of rich and chocolatey. I learned this the hard way after making brown disaster cakes for months thinking I could just add food coloring to chocolate cake batter. This classic red velvet cake has its own specific chemistry that you can't fake.
What are the main ingredients of red velvet cake?
The core players are flour, sugar, butter, eggs, buttermilk, a small amount of cocoa powder, red food coloring, vanilla, vinegar, and baking soda. But here's what took me forever to understand - the buttermilk and vinegar aren't just flavoring, they're creating a chemical reaction with the baking soda that makes the whole thing work. The cocoa is minimal compared to chocolate cake, just enough for subtle flavor and to help with the red color development. Don't forget the classic cream cheese frosting that makes it complete. Check this homemade red velvet cake breakdown for exactly how these ingredients work together.
What is the secret of red velvet cake?
The real secret is understanding it's all about the acid reaction - buttermilk and vinegar reacting with baking soda creates that signature tender texture and tangy flavor. Room temperature ingredients are crucial because cold butter won't cream properly and cold eggs can curdle the batter. Don't overmix once you add the flour or you'll develop too much gluten and get tough cake. The other secret I learned through expensive mistakes is that the cocoa powder amount is specific - too little and it's just vanilla cake, too much and it tastes bitter and looks brown instead of red. After years of failures, the biggest secret is respecting the chemistry instead of trying to improvise.
More Recipes That Actually Work
This red velvet cake recipe is perfect for celebrations that need a real showstopper dessert! When I'm making this impressive layer cake and want something savory to balance out all the sweetness, my cowboy mushrooms recipe creates restaurant-quality mushrooms that pair surprisingly well with leftover cake for indulgent weekend brunches. For comforting drinks that complement rich desserts like this red velvet cake, my boba tea recipe provides that perfect sweet, creamy refreshment that kids love just as much as fancy cake. And when you want hearty comfort food that grounds you after making elaborate desserts, my chicken rice casserole recipe delivers satisfying, family-friendly dinners that use simple ingredients but taste like you put in real effort.
Related
Looking for other recipes like this? Try these:

Pairing
These are my favorite dishes to serve with Red Velvet Cake Recipe :
Red Velvet Cake Recipe
Ingredients
Equipment
Method
- Bring butter, eggs, and cream cheese to room temperature - this is crucial for proper mixing. Sift flour and cocoa together to avoid lumps. Preheat oven to 350°F and grease two 9-inch round pans. Mix food coloring with a bit of water to make it easier to distribute evenly. Have everything measured and ready because this batter comes together fast.
- Cream butter and sugar for exactly 4 minutes until light and fluffy. Add eggs one at a time, beating well after each addition. Mix in vanilla and food coloring until evenly distributed. Don't rush this step or your cake will be dense. Scrape bowl sides constantly for even mixing.
- Alternate adding flour mixture and buttermilk in 3 additions, starting and ending with flour mixture. Mix on lowest speed just until flour disappears. Stir vinegar and baking soda together until it foams like crazy. Fold this foaming mixture gently into batter by hand with rubber spatula.
- Divide batter evenly between prepared pans using kitchen scale if you have one. Bake exactly 28 minutes for 9-inch pans until toothpick comes out with few moist crumbs. Cool in pans 10 minutes, then turn out onto wire racks. Cool completely before frosting - about 1 hour.
- Beat cream cheese and butter until completely smooth with no lumps. Gradually add powdered sugar while beating until frosting holds peaks and looks glossy. Add vanilla and salt, beat until combined. Frosting should be smooth and spreadable.
- Place first layer on serving plate and spread frosting evenly on top. Add second layer and frost top and sides using offset spatula for smooth finish. Refrigerate 30 minutes to set frosting before serving.
Leave a Reply